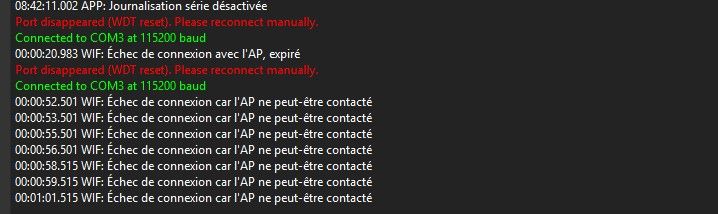
• téléinfo sur linky Triphasé mode Historique

    PiTInfo
    5
    0 Votes
    5 Posts
    226 Views
    E
    Bonjour @Charles , Le module utilisé était un wemod teleinfo qui fonctionnait très bien connecté au linky de ma précédente maison (monophasé HC/HC). Le code était écrit grâce à ton aide. En voici le code injecté : teleinfoLinky.txt #include <LibTeleinfo.h> // Parsing JSON #include <ArduinoJson.h> const size_t capacity = JSON_OBJECT_SIZE(4) + JSON_ARRAY_SIZE(4) + 60; String chaineJSONenvoyee; float frequenceInterro=60; String commentairePutWS=""; int PAC = 0; #define SERIAL_DEBUG Serial #define SERIAL_TIC Serial1 // Teleinfo RXD pin is connected to ESP32-PICO-V3-02 GPIO8 #define TIC_RX_PIN 23 _Mode_e tinfo_mode = TINFO_MODE_HISTORIQUE; //_Mode_e tinfo_mode = TINFO_MODE_STANDARD; TInfo tinfo; // Teleinfo object // Wakeup de 5 secondes #define uS_TO_S_FACTOR 1000000ULL /* Conversion factor for micro seconds to seconds */ #define TIME_TO_SLEEP 5 /* Time ESP32 will go to sleep (in seconds) */ #define LEDPIN LED_BUILTIN // Uptime timer boolean tick1sec=0;// one for interrupt, don't mess with unsigned long uptime=0; // save value we can use in sketch even if we're interrupted String sendJSON(ValueList * me, boolean all){ bool firstdatacomplete = true; bool firstdataenvoyee = true; String chaineJSONenvoyee = ""; String chaineJSONcomplete = ""; String Element_Valeur = ""; String separateur = ","; String sep; // Got at least one ? if (me) { PAC = 0; // Json start chaineJSONenvoyee = "{\"commentaire\":" + "\"" + commentairePutWS + "\""; chaineJSONcomplete = "{\"commentaire\":" + "\"" + commentairePutWS + "\""; // Loop thru the node while (me->next) { // go to next node me = me->next; // uniquement sur les nouvelles valeurs ou celles modifiées // sauf si explicitement demandé toutes if ( all || ( me->flags & (TINFO_FLAGS_UPDATED | TINFO_FLAGS_ADDED) ) ) { //Serial.println("|"+String(me->name)+"|") ; /* Serial.print(F("\"")) ; Serial.print(me->name) ; Serial.print(F("\":")) ; */ // we have at least something ? if (me->value && strlen(me->value)) { boolean isNumber = true; uint8_t c; char * p = me->value; // check if value is number while (*p && isNumber) { if ( *p < '0' || *p > '9' ) isNumber = false; p++; } // this will add "" on not number values if (!isNumber) { Element_Valeur = "\"" + String(me->name) + "\":" + "\"" + String(me->value) + "\""; } // this will remove leading zero on numbers else //Serial.print(atol(me->value)); Element_Valeur = "\"" + String(me->name) + "\":" + atol(me->value); } if (String(me->name) != "MSG1" && String(me->name) != "PJOURF+1" && String(me->name) != "ADSC" && String(me->name) != "VTIC" && String(me->name) != "NGTF" && String(me->name) != "LTARF" && String(me->name) != "EAST" && String(me->name) != "EASF01" && String(me->name) != "EASF02" && String(me->name) != "EASF03" && String(me->name) != "EASF04" && String(me->name) != "EASF05" && String(me->name) != "EASF06" && String(me->name) != "EASF07" && String(me->name) != "EASF08" && String(me->name) != "EASF09" && String(me->name) != "EASF10" && String(me->name) != "EASD01" && String(me->name) != "EASD02" && String(me->name) != "EASD03" && String(me->name) != "EASD04" && String(me->name) != "EAIT" && String(me->name) != "ERQ1" && String(me->name) != "ERQ2" && String(me->name) != "ERQ3" && String(me->name) != "ERQ4" && String(me->name) != "IRMS1" && String(me->name) != "URMS1" && String(me->name) != "PREF" && String(me->name) != "PCOUP" && String(me->name) != "PREF" && String(me->name) != "CCASN" && String(me->name) != "CCASN-1" && String(me->name) != "CCAIN" && String(me->name) != "CCAIN-1" && //String(me->name) != "UMOY1" && String(me->name) != "STGE" && String(me->name) != "PRM" && String(me->name) != "RELAIS" && String(me->name) != "NTARF" && String(me->name) != "NJOURF" && String(me->name) != "NJOURF+1" ){ chaineJSONenvoyee = chaineJSONenvoyee + separateur + Element_Valeur; } chaineJSONcomplete = chaineJSONcomplete + separateur + Element_Valeur; } } // Json end //Serial.println(F("}")) ; chaineJSONenvoyee = chaineJSONenvoyee + "}"; chaineJSONcomplete = chaineJSONcomplete + "}"; Serial.println("chaineJSONcomplete = " + chaineJSONcomplete ); Serial.println("chaineJSONenvoyee = " + chaineJSONenvoyee ); return chaineJSONcomplete; } } /* ====================================================================== Function: NewFrame Purpose : callback when we received a complete teleinfo frame Input : linked list pointer on the concerned data Output : - Comments: - ====================================================================== */ void NewFrame(ValueList * me){ SERIAL_DEBUG.println("NewFrame - uptime=" + String(uptime)); if (tick1sec) { concatlog("NewFrame - uptime=" + String(uptime)); chaineJSONenvoyee = sendJSON(me, true); postconsoWS(chaineJSONenvoyee); postlogsindb(); logcycle=""; ledClignotte(); tick1sec = false; } } /* ====================================================================== Function: UpdatedFrame Purpose : callback when we received a complete teleinfo frame Input : linked list pointer on the concerned data Output : - Comments: it's called only if one data in the frame is different than the previous frame ====================================================================== */ void UpdatedFrame(ValueList * me){ SERIAL_DEBUG.println("UpdatedFrame - tick1sec=" + String(tick1sec)); if (tick1sec) { concatlog("UpdatedFrame - uptime=" + String(uptime)); chaineJSONenvoyee = sendJSON(me, true); postconsoWS(chaineJSONenvoyee); postlogsindb(); logcycle=""; ledClignotte(); tick1sec = false; } } /* ====================================================================== Function: initSerial Purpose : Configure (or reconfigure Serial Port) Input : - Output : - Comments: - ====================================================================== */ void initSerial(){ // Cleanup SERIAL_TIC.flush(); SERIAL_TIC.end(); // Configure Teleinfo SERIAL_DEBUG.printf_P(PSTR("TIC RX=GPIO%d Mode:"), TIC_RX_PIN); SERIAL_TIC.begin(tinfo_mode == TINFO_MODE_HISTORIQUE ? 1200 : 9600, SERIAL_7E1, TIC_RX_PIN); if ( tinfo_mode == TINFO_MODE_HISTORIQUE ) { SERIAL_DEBUG.println(F("Historique")); } else { SERIAL_DEBUG.println(F("Standard")); } } /* ====================================================================== Function: ledOff Purpose : Setup I/O for RGB Led to be OFF Input : - Output : - Comments: - ====================================================================== */ void ledClignotte(){ digitalWrite(LED_BUILTIN, HIGH); // turn the LED on (HIGH is the voltage level) delay(1000); // wait for a second digitalWrite(LED_BUILTIN, LOW); // turn the LED off by making the voltage LOW } /* ====================================================================== Function: setup Purpose : Setup I/O and other one time startup stuff Input : - Output : - Comments: - ====================================================================== */ void setup(){ SERIAL_DEBUG.begin(115200); pinMode(LED_BUILTIN, OUTPUT); // Serial, pour le debug SERIAL_DEBUG.println(F("\r\n\r\n")); SERIAL_DEBUG.println(F("=================================================")); SERIAL_DEBUG.println(F(" D1 Mini ESP32 - Teleinfo Lynky Alim WS ")); SERIAL_DEBUG.println(F("=================================================")); SERIAL_DEBUG.println(F("\r\n")); SERIAL_DEBUG.println("[Setup] Gestion du Wifi avec WifiManager"); WifiGestion(); //SERIAL_DEBUG.println("[Setup] Récupération des paramètres de cet arduino : Fréquence d'interrogation et du commentaire de prise de mesure"); //GET_params_arduino(); SERIAL_DEBUG.println("[Setup] Alimentation des logs en BDD à travers le service REST (Requête POST)"); SERIAL_DEBUG.println("-------------------------------------------------------------------------------"); concatlog("[Setup] Alimentation des logs en BDD (Req POST)"); postlogsindb(); // Init Serial Port initSerial(); // Init teleinfo tinfo.init(tinfo_mode); // Attacher les callback dont nous avons besoin // pour cette demo, ADPS et TRAME modifiée tinfo.attachUpdatedFrame(UpdatedFrame); tinfo.attachNewFrame(NewFrame); } /* ====================================================================== Function: loop Purpose : infinite loop main code Input : - Output : - Comments: - ====================================================================== */ void loop() { static char c; static unsigned long previousMillis = 0; static uint8_t buttonState = 0; static unsigned long lastDebounceTime = 0; unsigned long currentMillis = millis(); /* // Avons nous recu un ticker de seconde? if (tick1sec) { tick1sec = false; uptime++; } */ // On a reçu un caractère ? if ( SERIAL_TIC.available() ) { // Le lire c = SERIAL_TIC.read(); // Gérer tinfo.process(c); // L'affcher dans la console if (c==TINFO_STX) { SERIAL_DEBUG.print("<STX>"); } else if (c==TINFO_ETX) { SERIAL_DEBUG.print("<ETX>"); } else if (c==TINFO_HT) { SERIAL_DEBUG.print("<TAB>"); } else { SERIAL_DEBUG.print(c); } } //SERIAL_DEBUG.println("currentMillis=" + String(currentMillis) + "previousMillis=" + String(previousMillis)); if (currentMillis - previousMillis > 60000 ) { SERIAL_DEBUG.println("IL FAUT ENREGISTRER UNE MESURE"); // save the last time you blinked the LED previousMillis = currentMillis; tick1sec = true; } } Suite à la proposition de @Nicolas-Bernaerts, j'ai commandé un Denky D4 1.3a mais ne connaissant pas du tout Tasmota, je me heurte à la configuration. Quel test rapide puis-je faire pour vérifier les valeurs récupérées du flux téléinfo ? (A terme, l'idée est de pouvoir injecter les consos de mes 3 phases toutes les minutes à ma base de données mySql (hébergée par AlwaysData)
  • 0 Votes
    4 Posts
    2k Views
    SbastienGa99566S
    @Charles J'ai testé sur le port 0/RX et j'obtiens la même chose.
  • Ré-écriture de Wifinfo pour traiter le mode standard du Linky

    WifInfo
    110
    0 Votes
    110 Posts
    23k Views
    CharlesC
    @dugolf Top, merci de continuer à faire vivre ce projet de WiFinfo, j'ai toujours regretté de ne pas pouvoir y consacrer plus de temps.
  • WifInfo - erreur compilation apres Maj biblios et IDE

    WifInfo
    2
    0 Votes
    2 Posts
    395 Views
    D
    @Phi13 Prenez cette version, elle est validée en mode historique et en mode standard Elle fonctionne aussi bien sur ESP8266 que sur ESP32 https://github.com/Duglof/LibTeleinfo/tree/esp32 Bon usage
  • WifInfo - coquilles version 1.0.7

    WifInfo
    2
    0 Votes
    2 Posts
    447 Views
    D
    Prenez cette version, elle est validée en mode historique et en mode standard Elle fonctionne aussi bien sur ESP8266 que sur ESP32 https://github.com/Duglof/LibTeleinfo/tree/esp32 Bon usage
  • 0 Votes
    79 Posts
    97k Views
    CharlesC
    @dugolf Top, merci pour le partage
  • 0 Votes
    7 Posts
    1k Views
    CharlesC
    @Nalexdouze Merci pour le partage, c'est effectivement la meilleure solution, en plus tu peux modifier ou dispatcher tes flux vers plusieurs solutions si besoin. J'aurais fait pareil
  • tasmota pitinfo 5 problème oled :mise a jour ?

    PiTInfo
    7
    0 Votes
    7 Posts
    2k Views
    Nicolas BernaertsN
    @tantale007 relisez vos posts et vous comprendrez que même une âme très charitable ne pourra pas vous aider. Vous propos sont incompréhensibles, aucun contexte, aucune référence, vous parlez d'écran oled sans référence, ... Désolé
  • 0 Votes
    10 Posts
    1k Views
    CharlesC
    @Matlo Excellent, merci du retour, bug tordu
  • Installation basique teleinfo V3 USB

    MicroTéléinfo
    5
    1
    0 Votes
    5 Posts
    225 Views
    M
    Je te poste mon fichier de mode d'emploi que j'ai fait pour un pote ! [image: 1736938009656-pour-relever-le-compteur-edf-avec-te-le-info.jpg]
  • Jeu sur les énergies dans la maison

    General Discussion
    5
    0 Votes
    5 Posts
    394 Views
    Nicolas BernaertsN
    @mimi-lamite En fait, pour chaque utilisation vous devrez flasher un esp32 et le configurer : linky, gazpar, radiateur fil pilote, ... Ensuite vous récupérez toutes les données en central via home assistant, OpenHab, ... Et une fois que tout fonctionne correctement, vous pourrez commencer votre projet de jeu autour des données centralisées. Mais il va falloir des compétences en codage.
  • Installation de teleinfo pour un débile informatique

    Téléinfo
    3
    0 Votes
    3 Posts
    2k Views
    M
    @Charles Merci Charles !
  • Tentative avec le MicroTéléinfoV3

    MicroTéléinfo
    6
    1
    0 Votes
    6 Posts
    302 Views
    CharlesC
    @Fredonnement Yes parfois j'ai des comportements bizarre avec HA sur la téléinfo, en plus j'utilise le FW de Nicolas sur un ESP32 donc pas du tout la même config, mais parfois idem j'ai des infos qui remontent plus (uniquement dans HA) alors qu'ailleurs ça marche impek (et parfois un reboot de HA règle aussi)
  • Denky D4 + Tempo

    Denky D4
    23
    0 Votes
    23 Posts
    2k Views
    T
    @Tostaky said in Denky D4 + Tempo: payload['IDX_SOUT_HP'] = value['EASF02'] payload['IDX_SOUT_HC'] = value['EASF01'] Evidement, ces lignes sont en trop
  • Boitier pour dongle MicroTeleinfo v3

    MicroTéléinfo
    14
    0 Votes
    14 Posts
    1k Views
    F
    @Thomas-DENOLLE & @razerban : J'ai recréé le fichier manquant : "µTeleinfo_slim_case_top.stl"
  • Denky D4 sur compteur PME/PMI - pas de trames

    Denky D4
    6
    0 Votes
    6 Posts
    2k Views
    CharlesC
    @labu73 il te faut un adaptateur RS232 vers TTL https://www.amazon.fr/DollaTek-MAX3232-Serial-Convertisseur-Connecteur/dp/B07DK3874B ou plus petit https://www.amazon.fr/Lot-mini-RS232-vers-MAX3232/dp/B07XM6RNZG/
  • TéléInfo et compteur PME-PMI

    Téléinfo
    7
    0 Votes
    7 Posts
    450 Views
    L
    @lambda2 as tu réussi à faire marcher la téléinfo? J'ai le même compteur. Cordialement, Laurent
  • Alimentation ESP8266 par borne I1 et A du linky

    Téléinfo
    29
    0 Votes
    29 Posts
    9k Views
    CharlesC
    @EliasMM Top, merci pour le lien
  • 0 Votes
    5 Posts
    3k Views
    T
    @Charles Bonjour, aujourd’hui l’installateur a activé le ModBus TCP dans mon onduleur. Je pense on peux le faire soi-même mais chez moi, c'est l'installateur qui l'a fait. J’ai changé mon serveur pour home assistant et maintenant il est installé sur un Rpi4. (plus rapide que dans virtualization station sur le Qnap) J’ai ajouté https://github.com/WillCodeForCats/solaredge-modbus-multi dans HA et configurer l’adresse IP. L'onduleur est connecté par UTP dans mon réseau et il a une adresse IP 192.168.xxx.xxx Après, redémarrage HA , les paramètre avancé de Solaredge se montre sur la page d’accueil. ici une exemple avec les paramètres d'onduleur. [image: 1730746554493-solaredge-with-tcp.png] Dans la semaine je vais m'occupé avec le dashboard. cordialement, Tom
  • interroger teleinfo tasmota via commandes http ?

    Denky D4
    11
    0 Votes
    11 Posts
    4k Views
    Nicolas BernaertsN
    @lebphi vous avez pu tester la nouvelle version ?