Skip to content
  • Blog
  • Categories
  • Recent
  • Tags
  • Popular
  • Users
  • Groups
Skins
  • Light
  • Brite
  • Cerulean
  • Cosmo
  • Flatly
  • Journal
  • Litera
  • Lumen
  • Lux
  • Materia
  • Minty
  • Morph
  • Pulse
  • Sandstone
  • Simplex
  • Sketchy
  • Spacelab
  • United
  • Yeti
  • Zephyr
  • Dark
  • Cyborg
  • Darkly
  • Quartz
  • Slate
  • Solar
  • Superhero
  • Vapor

  • Default (No Skin)
  • No Skin
Collapse
Brand Logo

Community Forum

  1. Home
  2. Categories
  3. Téléinfo
  4. PiTInfo
  5. Plantage raspi au branchement PiTinfo

Plantage raspi au branchement PiTinfo

Scheduled Pinned Locked Moved PiTInfo
plantagebugraspberrypitinfoshutdown
16 Posts 2 Posters 3.7k Views 2 Watching
  • Oldest to Newest
  • Newest to Oldest
  • Most Votes
Reply
  • Reply as topic
Log in to reply
This topic has been deleted. Only users with topic management privileges can see it.
  • CharlesC Offline
    CharlesC Offline
    Charles
    wrote on last edited by Charles
    #4

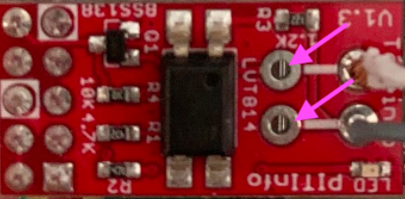
    le branchement semble correct

    mais c'est quoi dessous ici ?

    5e5969cc-aef2-430f-9272-383199518c4f-image.png

    1 Reply Last reply
    • sergentdu57S Offline
      sergentdu57S Offline
      sergentdu57
      wrote on last edited by
      #5

      Il s'agit d'un processeur de la carte mère du Raspbery, mais il n'est pas en contact avec l'autre face du PiTinfo. Il reste environ 1cm entre les deux.

      1 Reply Last reply
      • CharlesC Offline
        CharlesC Offline
        Charles
        wrote on last edited by
        #6

        Je parlais des 2 pins entrantes (son soudées) dans les trous du PI Téléinfo indiqué par les flêches.

        Comme tu as soudés les fils je ne vois pas bien ce que ça fait, là j'essaie juste de comprendre.

        1 Reply Last reply
        • sergentdu57S Offline
          sergentdu57S Offline
          sergentdu57
          wrote on last edited by
          #7

          Oui justement, rien n'est soudé entre ces deux bornes, on voit une partie d'un processeur raspbery à travers les perçage.
          Les deux fils (blanc et gris) soudés sont prévu pour le raccordement à la prise TIC du linky, mais sont actuellement isolé.

          1 Reply Last reply
          • CharlesC Offline
            CharlesC Offline
            Charles
            wrote on last edited by
            #8

            C'est curieux.

            Qd tu mets la carte le PI ne démarre pas c'est bien ça ? Si oui peux tu mettre la carte sans brancher la téléinfo ?

            1 Reply Last reply
            • sergentdu57S Offline
              sergentdu57S Offline
              sergentdu57
              wrote on last edited by
              #9

              La led du raspi s'allume, mais impossible de se connecter en SSH ou Apache.
              Je retire le module PiTinfo et le raspi devient accessible à nouveau au bout d'une vingtaine de seconde.
              Je rebranche le PiTinfo, le SSH commence à ramer puis plus de connexion à nouveau.
              Je retire le module ça revient, etc...
              J'ai testé avec et sans la télé info, c'est pareil.

              1 Reply Last reply
              • CharlesC Offline
                CharlesC Offline
                Charles
                wrote on last edited by Charles
                #10

                tu peux faire un

                cat /boot/cmdline.txt
                puis
                cat /boot/config.txt

                et poster le résultat stp.

                root@pi03(ro):~# cat /boot/cmdline.txt 
                
                dwc_otg.lpm_enable=0 console=tty1 root=/dev/mmcblk0p2 rootfstype=ext4 elevator=deadline fsck.repair=yes rootwait fastboot noswap ro
                
                
                root@pi03(ro):~# cat /boot/config.txt 
                
                #uncomment to overclock the arm. 700 MHz is the default.
                #arm_freq=800
                
                # enable the optional hardware interfaces
                dtparam=i2c_arm=on
                dtparam=spi=on
                
                # enable real serial 
                dtoverlay=pi3-miniuart-bt
                
                # Enable audio (loads snd_bcm2835)
                dtparam=audio=on
                gpu_mem=16
                enable_uart=1
                
                
                1 Reply Last reply
                • sergentdu57S Offline
                  sergentdu57S Offline
                  sergentdu57
                  wrote on last edited by
                  #11
                  pi@raspberrypi:~ $ cat /boot/cmdline.txt
                  
                  pi@raspberrypi:~ $ cat /boot/config.txt
                  # For more options and information see
                  # http://rpf.io/configtxt
                  # Some settings may impact device functionality. See link above for details
                  
                  # uncomment if you get no picture on HDMI for a default "safe" mode
                  #hdmi_safe=1
                  
                  # uncomment this if your display has a black border of unused pixels visible
                  # and your display can output without overscan
                  #disable_overscan=1
                  
                  # uncomment the following to adjust overscan. Use positive numbers if console
                  # goes off screen, and negative if there is too much border
                  #overscan_left=16
                  #overscan_right=16
                  #overscan_top=16
                  #overscan_bottom=16
                  
                  # uncomment to force a console size. By default it will be display's size minus
                  # overscan.
                  #framebuffer_width=1280
                  #framebuffer_height=720
                  
                  # uncomment if hdmi display is not detected and composite is being output
                  #hdmi_force_hotplug=1
                  
                  # uncomment to force a specific HDMI mode (this will force VGA)
                  #hdmi_group=1
                  #hdmi_mode=1
                  
                  # uncomment to force a HDMI mode rather than DVI. This can make audio work in
                  # DMT (computer monitor) modes
                  #hdmi_drive=2
                  
                  # uncomment to increase signal to HDMI, if you have interference, blanking, or
                  # no display
                  #config_hdmi_boost=4
                  
                  # uncomment for composite PAL
                  #sdtv_mode=2
                  
                  #uncomment to overclock the arm. 700 MHz is the default.
                  #arm_freq=800
                  
                  # Uncomment some or all of these to enable the optional hardware interfaces
                  #dtparam=i2c_arm=on
                  #dtparam=i2s=on
                  #dtparam=spi=on
                  
                  # Uncomment this to enable infrared communication.
                  #dtoverlay=gpio-ir,gpio_pin=17
                  #dtoverlay=gpio-ir-tx,gpio_pin=18
                  
                  # Additional overlays and parameters are documented /boot/overlays/README
                  
                  # Enable audio (loads snd_bcm2835)
                  dtparam=audio=on
                  
                  [pi4]
                  # Enable DRM VC4 V3D driver on top of the dispmanx display stack
                  dtoverlay=vc4-fkms-v3d
                  max_framebuffers=2
                  
                  [all]
                  #dtoverlay=vc4-fkms-v3d
                  enable_uart=1
                  
                  # Disable bluetooth
                  dtoverlay=pi3-miniuart-bt
                  #dtoverlay=pi3-disable-bt
                  dtoverlay=w1-gpio
                  
                  
                  CharlesC 1 Reply Last reply
                  • sergentdu57S sergentdu57
                    pi@raspberrypi:~ $ cat /boot/cmdline.txt
                    
                    pi@raspberrypi:~ $ cat /boot/config.txt
                    # For more options and information see
                    # http://rpf.io/configtxt
                    # Some settings may impact device functionality. See link above for details
                    
                    # uncomment if you get no picture on HDMI for a default "safe" mode
                    #hdmi_safe=1
                    
                    # uncomment this if your display has a black border of unused pixels visible
                    # and your display can output without overscan
                    #disable_overscan=1
                    
                    # uncomment the following to adjust overscan. Use positive numbers if console
                    # goes off screen, and negative if there is too much border
                    #overscan_left=16
                    #overscan_right=16
                    #overscan_top=16
                    #overscan_bottom=16
                    
                    # uncomment to force a console size. By default it will be display's size minus
                    # overscan.
                    #framebuffer_width=1280
                    #framebuffer_height=720
                    
                    # uncomment if hdmi display is not detected and composite is being output
                    #hdmi_force_hotplug=1
                    
                    # uncomment to force a specific HDMI mode (this will force VGA)
                    #hdmi_group=1
                    #hdmi_mode=1
                    
                    # uncomment to force a HDMI mode rather than DVI. This can make audio work in
                    # DMT (computer monitor) modes
                    #hdmi_drive=2
                    
                    # uncomment to increase signal to HDMI, if you have interference, blanking, or
                    # no display
                    #config_hdmi_boost=4
                    
                    # uncomment for composite PAL
                    #sdtv_mode=2
                    
                    #uncomment to overclock the arm. 700 MHz is the default.
                    #arm_freq=800
                    
                    # Uncomment some or all of these to enable the optional hardware interfaces
                    #dtparam=i2c_arm=on
                    #dtparam=i2s=on
                    #dtparam=spi=on
                    
                    # Uncomment this to enable infrared communication.
                    #dtoverlay=gpio-ir,gpio_pin=17
                    #dtoverlay=gpio-ir-tx,gpio_pin=18
                    
                    # Additional overlays and parameters are documented /boot/overlays/README
                    
                    # Enable audio (loads snd_bcm2835)
                    dtparam=audio=on
                    
                    [pi4]
                    # Enable DRM VC4 V3D driver on top of the dispmanx display stack
                    dtoverlay=vc4-fkms-v3d
                    max_framebuffers=2
                    
                    [all]
                    #dtoverlay=vc4-fkms-v3d
                    enable_uart=1
                    
                    # Disable bluetooth
                    dtoverlay=pi3-miniuart-bt
                    #dtoverlay=pi3-disable-bt
                    dtoverlay=w1-gpio
                    
                    
                    CharlesC Offline
                    CharlesC Offline
                    Charles
                    wrote on last edited by Charles
                    #12

                    @sergentdu57 je viens d'installer un pi from scratch et ma config est la suivante

                    pi@pi03:~ $ cat /boot/cmdline.txt 
                    console=tty1 root=PARTUUID=154c1e98-02 rootfstype=ext4 elevator=deadline fsck.repair=yes rootwait
                    pi@pi03:~ $ cat /boot/config.txt 
                    # For more options and information see
                    # http://rpf.io/configtxt
                    # Some settings may impact device functionality. See link above for details
                    
                    # uncomment if you get no picture on HDMI for a default "safe" mode
                    #hdmi_safe=1
                    
                    # uncomment this if your display has a black border of unused pixels visible
                    # and your display can output without overscan
                    #disable_overscan=1
                    
                    # uncomment the following to adjust overscan. Use positive numbers if console
                    # goes off screen, and negative if there is too much border
                    #overscan_left=16
                    #overscan_right=16
                    #overscan_top=16
                    #overscan_bottom=16
                    
                    # uncomment to force a console size. By default it will be display's size minus
                    # overscan.
                    #framebuffer_width=1280
                    #framebuffer_height=720
                    
                    # uncomment if hdmi display is not detected and composite is being output
                    #hdmi_force_hotplug=1
                    
                    # uncomment to force a specific HDMI mode (this will force VGA)
                    #hdmi_group=1
                    #hdmi_mode=1
                    
                    # uncomment to force a HDMI mode rather than DVI. This can make audio work in
                    # DMT (computer monitor) modes
                    #hdmi_drive=2
                    
                    # uncomment to increase signal to HDMI, if you have interference, blanking, or
                    # no display
                    #config_hdmi_boost=4
                    
                    # uncomment for composite PAL
                    #sdtv_mode=2
                    
                    #uncomment to overclock the arm. 700 MHz is the default.
                    #arm_freq=800
                    
                    # Uncomment some or all of these to enable the optional hardware interfaces
                    dtparam=i2c_arm=on
                    #dtparam=i2s=on
                    dtparam=spi=on
                    
                    # Uncomment this to enable infrared communication.
                    #dtoverlay=gpio-ir,gpio_pin=17
                    #dtoverlay=gpio-ir-tx,gpio_pin=18
                    
                    # Additional overlays and parameters are documented /boot/overlays/README
                    
                    # Enable audio (loads snd_bcm2835)
                    dtparam=audio=on
                    
                    [pi4]
                    # Enable DRM VC4 V3D driver on top of the dispmanx display stack
                    dtoverlay=vc4-fkms-v3d
                    max_framebuffers=2
                    
                    [all]
                    #dtoverlay=vc4-fkms-v3d
                    enable_uart=1
                    gpu_mem=16
                    dtoverlay=pi3-miniuart-bt
                    

                    Donc visiblement la même que toi (sauf que j'ai pas de contenu de ta cmdline.txt.

                    Puis testé avec nouveau prog de test
                    https://github.com/hallard/teleinfo-test

                    pi@pi03:~/teleinfo-test $ ./teleinfo.py 
                    Missing serial port argument trying to find Teleinfo
                    Teleinfo : Mode Historique
                    Port     : /dev/ttyAMA0
                    Vitesse  : 1200
                    
                    IINST 001 X
                    IMAX 002 A
                    PAPP 00190 +
                    HHPHC A ,
                    MOTDETAT 000000 B
                    ADCO 021528603314 :
                    OPTARIF HC.. <
                    ISOUSC 15 <
                    HCHC 000723392  
                    HCHP 001742371 ,
                    PTEC HP..  
                    IINST 001 X
                    IMAX 002 A
                    PAPP 00180 *
                    

                    Si tu veux tu peux me renvoyer le module dès réception je test et t'en fait parvenir un nouveau. Mais ça serait top si tu pouvais l'essayer sur un autre Pi

                    tu peux m'indiquer le modele de pi ?

                    pi@pi03:~/teleinfo-test $ cat /proc/device-tree/model 
                    Raspberry Pi 3 Model B Rev 1.2
                    
                    1 Reply Last reply
                    • sergentdu57S Offline
                      sergentdu57S Offline
                      sergentdu57
                      wrote on last edited by
                      #13

                      Je regarde ça cette semaine et je vous tiens au courant.
                      Je peux tester sur un arduino éventuellement.

                      1 Reply Last reply
                      • sergentdu57S Offline
                        sergentdu57S Offline
                        sergentdu57
                        wrote on last edited by
                        #14

                        Je viens de tester sur arduino, le module fonctionne bien je reçoit bien la trame.
                        Je vais réinstaller le raspbery et recommencer le mappage du port série et je vous tiens informé.

                        1 Reply Last reply
                        • sergentdu57S Offline
                          sergentdu57S Offline
                          sergentdu57
                          wrote on last edited by
                          #15

                          Après réinstallation du Raspberry et mappage du port série la réception de la trame se fait correctement.
                          Merci pour votre aide.

                          1 Reply Last reply
                          • CharlesC Offline
                            CharlesC Offline
                            Charles
                            wrote on last edited by
                            #16

                            Ok top, merci du retour.

                            1 Reply Last reply

                            Hello! It looks like you're interested in this conversation, but you don't have an account yet.

                            Getting fed up of having to scroll through the same posts each visit? When you register for an account, you'll always come back to exactly where you were before, and choose to be notified of new replies (either via email, or push notification). You'll also be able to save bookmarks and upvote posts to show your appreciation to other community members.

                            With your input, this post could be even better 💗

                            Register Login
                            Reply
                            • Reply as topic
                            Log in to reply
                            • Oldest to Newest
                            • Newest to Oldest
                            • Most Votes


                            2

                            Online

                            5.8k

                            Users

                            565

                            Topics

                            5.3k

                            Posts

                            Top Topics

                            Popular Tags

                            teleinfo
                            25 topics
                            arduino
                            19 topics
                            remora
                            16 topics
                            esp8266
                            10 topics
                            arduipi
                            10 topics
                            raspberry
                            8 topics
                            wifinfo
                            7 topics
                            broadcast
                            7 topics
                            Copyright © 2022 Charles-Henri Hallard | Return to blog page | Powered by NodeBB
                            • Login

                            • Don't have an account? Register

                            • Login or register to search.
                            • First post
                              Last post
                            0
                            • Blog
                            • Categories
                            • Recent
                            • Tags
                            • Popular
                            • Users
                            • Groups